Cricut projects, Cardmaking, Crochet, Jewelry and More! Everything handmade will be posted here!
Wednesday, December 30, 2009
Money Card Holder.... With Free Cut File!!
Hi everyone, Here is a money card holder, I created in Cricut DesignStudio. I added the Gypsy file too for all you Gypsy users. I finally figured out how to convert the files. This money card can be cut out on 8 1/2 by 11 inch cardstock. I punched two holes, tied a ribbon and glued two small pieces of velcro fasteners to keep card closed. If you want to know how I made the bow. I used the Bowdabra Bowmaker. If you want to know more about the Bowdabra Bowmaker. Please visit www.bowdabra.com. Let me know if something is wrong with my cut files and I will fix it. Leave a comment or Email me. Have a safe and Happy New Year all!! Happy New Year!
Cartridge Used:
Gypsy Wanderings ( to cut out money card).
Designstudio cut file here
Gypsy file here
If you download my cut files. Please be kind and leave a comment. Comments is what keeps me motivated to create more cut files. Enjoy!
Monday, December 21, 2009
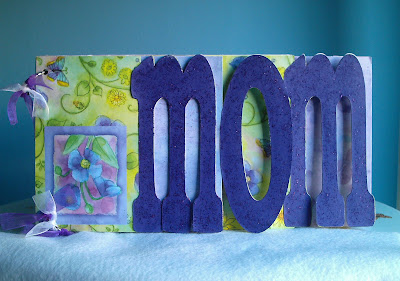
Mom Word Book Album ... With Free Cut File!
Hi! Everyone, Happy Monday to you all! I hope you all are having a wonderful Christmas week! Here is a Mom word book album I created in Cricut DesignStudio. I wanted to make another word book album so I made one for my Mom. I added the cut file if you want to make one too. I used chipboard to make mine and some pretty flower and butterfly pattern paper. Enjoy making one!
Cartridge I used:
Plantin SchoolBook (to cut out Mom word book album) created in Cricut DesignStudio.
Here is the cut file!
Saturday, December 19, 2009
My Little Princess Playing In The Snow!!
Hi! Everyone, It's snowy here. This is going to be a big snow fall. My daughter had to go out and play in it! She was having so much fun out there! She been sick with her allergies all week and I've been up with her during the night, but she is feeling better today. You all have a nice weekend and Merry Christmas!
Saturday, December 12, 2009
A Boy And Girl Gingerbread Card ... With Free Cut File!!
Hi, everyone! Here is another Christmas card I welded in Cricut DesignStudio. It's a boy and girl gingerbread card. I cut both cards on 12 x12 mat, I used solid tan cardstock to make cards. I used another 12 x 12 for inside of card and I used pattern paper for square cut. I made 15 girl and 15 boy gingerbread cards. I think they look really cute! I hope you all like them too. This is for Just Buggin Challenge # 15: Happy Holidays to make a Christmas or winter holiday themed project. I added the cut file if anyone wants to make them. Have a nice week end all! :)
Cartridge I used:
Plantin Schoolbook to cut (Square).
Paper Doll Dress Up to cut (girl and boy gingerbread).
Cut file is here.
Friday, December 4, 2009
Christmas Explosion Box ... With A Cut File
Click photo to enlarge Hi! everyone. Here is a Christmas Explosion Box I made in Cricut DesignStudio. I been seeing alot of this boxes and I wanted to give one a try. I tryed to make a video with this project. I did the best I could. It will take time I guess. Next time I will try to stay on camera "LOL". The paper on the inside of box is atd Season Paper Pad and outside of box is DCWV The Christmas Stack Cardstock got both paper packs at AC Moore. The Foil Doilies are Wilton and stickers are both from Walmart. I hope you enjoy my video and thanks for watching! Cartridge I used: Plantin Schoolbook to make explosion box and lid in Cricut DesignStudio. Winter Woodland for 3D tree cut. For gift card pocket cut a piece of cardstock 3 3/4 inch W by 2 inch H. Add some ribbon on top of box. Here is the cut file.
Explosion Box Video
Explosion Box Video
Friday, November 20, 2009
Happy 10th Anniversary To.....
Click photo to enlarge
Me and Paul! Today is are 10th year Wedding Anniversary. We have been together for 27 years, but we have only been married for 10 years. We got married in a church we attended and we had a reception in the VFW Hall 10 year ago today. I remember the first time I seen Paul, I was 18 years old I know from that day on he was my soul mate and we would be together forever. Happy anniversary Paul and I hope we have many more! I made this LO in Cricut DesignStudio so I could post so you all could see how young we looked back then. Wow! we looked so young here. My four year old daughter looked at the LO and said " mommy you look like a princess lets go play dress up". Have a good day all.
Cartridge I used:
Wedding Solution for (love birds and heart at bottom page).
Plantin SchoolBook for (small hearts, flower and rectangle).
Opposites Attract for (letters) all welded in DesignStudio.
Monday, November 16, 2009
Joy, Hope, Peace, Believe Card....With A Cut File!!
Click photo to enlarge
Hi everyone, Here is a Christmas Card I made for CuttleBug Be Inspired #57 Operations Write Home Challenge. I welded this Joy, Hope, Peace, Believe and star in Cricut DesignStudio. I tryed to make the words look like a shape of a Christmas Tree. I embossed it with Cuttlebug Swiss Dots. Card size is 5 1/2 height by 4 1/4 wide. I added the cut file if anyone wants to make a card like this. If you make a card like this you need the cartridge I used.
Cartridge I used:
Plantin SchoolBook for (Letters and circle).
Joy Of The Season for (Star).
Here is the cut file! Have a good night all. :)
Thursday, November 12, 2009
Im One Of Top Ten On Cuttlebug Challenge!!
Hi everyone! I wanted to let you all know that Im one of the Thanksgiving top ten at the Cuttlebug Challenge, Be inspired #56 Challenge. Im not the winner of the Teresa Collins kit, but I did win a Digital Stamps from Digital Delights by Louby Loo. I entered my Give Thanks Word Book. My first time winning something. Yippeeee..... Have a good day all!
Wednesday, November 11, 2009
My First Gypsy Project!!
Click photo to enlarge
Hi everyone, Here is my first project I Designed with my Gypsy! I used the cup from Gypsy Wanderings. I made a cup box. I been making alot of boxes lately. This box can be used for a thank you, birthday, christmas etc. I just learned how to use the Gypsy. I had to update my Cricut Expression and DesignStudio and the Gypsy because it would not work with my Cricut Expression. Now it is working and Im good to go and create alot of cut file projects. Cup box size is 4 1/4 height by 5 1/4 wide by 1 1/2 depth. It can hold two packs of cocoa. I put a coffee pack in mine. I hope you all like my cup box!
Here are the Cartridge I used:
Gypsy Wanderings to make ( cup box with Gypsy)
Plantin SchoolBook to make (cup box with Gypsy)
Winter Woodland for (tag on front of cup box)
I will add cut file later on. Have a good night all!
Thursday, November 5, 2009
Give Thanks Word Book..With Cut File
Click photo to enlarge
Hi everyone, Here is a give thanks word book I made in DesignStudio. I cheated on this project I used die cut that I bought at Walmart. I will add my pictures later and maybe some more die cuts. You can add alot of photo or more die cuts to this book if you make one. I made this to give thanks to all my blogging friends for Thankgiving. I thank each and everyone of you for following my blog. I hope you all like it. I added the cut file if you all want to make one. I added a lot of photo so you can see the pages of the book. Book size is 5 1/4 inch height by 11 inch wide is the last page of book.
Cartridge I used:
Plantin Schoolbook (to cut Word book out).
Here is the cut file! Enjoy making one! :0)
I don't have a Zutter bind it all I had to use book rings for mine and I used my Crop - A -Dile II Big Bite to punch holes and set the eyelets on front and back of book. Have a good day all! :0)
Monday, November 2, 2009
Square Box....With Cut File!!
Click image to enlarge
Here is the score and fold samples
Hi everyone, Here is a square box I made in DesignStudio. I added my cut file if you want to download it! The box size is about 3 1/4 h by 4 1/4 w. It's not all that but I like the outcome of the box. After scoring take scissors to all four corners where the start to score line is and snip to next score line. This will help box and top to fold and glue easy together.
Cartridge I used:
Plantin SchoolBook (You need this cartridge to cut the top and bottom of the box out).
Here is the download cut file.
Sunday, November 1, 2009
I Got An Award!!!
I was given this award by Sandy her blog and creations are beautiful so get over there and take a look! You will love her work!
The rules are this: I need to pass this award on to five people, post on their blog to let them know I left this award, and then I need to answer a list of questions in ONE word.
1. Where is your cell phone? Purse
2. Your hair? brown
3. Your mother? beautiful
4. Your father? kind
5. Your favorite food? Pizza
6. Your dream last night? forgot
7. Your favorite drink? coffee
8. Your dream/goal? work
9. What room are you in? dining
10. Your hobby? papercrafts
11. Your fear? dying
12. Where do you want to be in 6 years? here
13. Where were you last night? party
14. Something that you aren't? hateful
15. Muffins? apple
16. Wish list item? cartridge
17. Where did you grow up? everywhere
18. Last thing you did? eat
19. What are you wearing? t-shirt
20. Your TV? on
21. Your Pets? birds
22. Friends? alot
23. Your life? Blessed
24. Your mood? happy
25. Missing Someone? mom
26. vehicle? car
27. Something your not wearing? shoes
28. Your favorite store? craft
29. Your favorite color? blue
30. When was the last time you laughed? yesterday
31. Last time you cried? week
32. Your best friend? Mary
33. One place that I go to over and over? pray
34. Facebook? never
35. Favorite place to eat? Pizza hut
Here are the five people Im passing the award to.
1. Jeannine
2. Sheryl
3. Natalie
4. Kristin G
5. Sheena
Thursday, October 29, 2009
Trick or Treat Layout...With Cut File!
Click photo to enlarge
Hi everyone, This is a Halloween Layout I made and welded in DesignStudio. If you have the cartridge I used you can download my cut file and make one. I hope you all like it! I will add the pitures later on.
Cartridge I used:
Plantin Schoolbook for (letters) welded and cut at 1 1/2 inch.
Stretch your Imagination for (spider and pumkin) cut one spider 2 1/2 inch and layers and one pumkin 3 1/2 inch and layers.
Doodlecharms for (Spider) cut one spider 3 1/2 inch and hit shift and cut one spiders. I used a silver glitter gel pen and pen stitch around the letter and picture area. My pen stitching is all over the place "lol". I added black and silver spider web ribbon and added black seed beads for spiders eyes and nose
Here is the download cut file! Enjoy
Wednesday, October 28, 2009
Once Upon A Time Scrapbook Layout!!
Click photo to enlarge
Hi everyone, Here is a framed scrapbook layout my sister made for me. This is a beautiful scrapbook layout of my Family. The top picture is me (Judy) holding my daughter she was ten months old here, my husband and my son. The other picture is my daughter when she was two years old. The little boy is a old picture of my bother Earl when he was five he is fifty years old now. The other picture is my sister Beverly, my sister Maglene, my bother Earl not in the picture, my sister Brenda, Thats me (Judy) in the red, My brother Joseph and my brother Ricky, we are in order from oldest to youngest. The front row is my Dad and Mom. Beverly used The Once Upon a Time Stack by DCWV.
Sunday, October 25, 2009
I Got My Gypsy!!
Hi all, I got my Gypsy yesterday! My husband bought it. It's a early 10 years Anniversary present our 10 years is November 20th. He heard me talking so much about it and trying to win one, he got it for me. Im so happy I got the Gypsy. Im ready to start learning how to use it. Yipeee!!!!
Friday, October 23, 2009
Merry Christmas Card!!
Click photo to enlarge
Hi all, Here is a card for Delightful Sketches Challenge, I used the Freebie Friday Image from Digital Delights by Louby Loo. This image is so cute I like all of Wendy's images. Card size is 4 1/4 by 5 1/2. I used my colored pencils and glitter gel pens to color the moose image.
Cartridge I used :
Potpourri Basket for ( Snow flake) cut.
Plantin SchoolBook for (oval) cut.
Have a good weekend all!
Thursday, October 22, 2009
Halloween Trick or Treat Card!!
Click photo to enlarge
Hi all, Here is two cards I made for Creative Inspirations Challenge #32 Halloween. I used the Freebie Friday Image from Digital Delights by Louby Loo. If you want this image, today is the last day to get it free. Go and visit Digital Delight by Louby Loo today and see all her images! My card size is 4 1/4 by 5 1/2 inch.
Cartridge I used:
Wild Card for (Icon) on page 33 That is the green and orange cut on front of card.
Tuesday, October 20, 2009
A Handmade Gift Box !
Hi all, Here is a box I made! This handmade gift box can be used for handmade A2 cards and evelopes or small writing tablets and pencils. This can be a gift for co workers etc. The box I made measure 1 1/2 depth by 4 1/2 width by 4 1/2 height. I used cereal box chipboard and I used grip - tac self adhesive decorating covering to cover the chipboard. I got the grip-tac at the dollar store 18 x 40 inch for $1.00. I like this grip -tac it makes it waterproof. Have a good day all!
Sunday, October 18, 2009
Tag Box ...With Cut file!
Here is a box I made for the Halloween Party. I made this tag box with Cricut DesignStudio. This box was made with a tag and square from Plantin SchoolBook Cartridge. These tag boxes can be used for any occasion holiday,birthday etc. Box size is 3 1/8 in Wide by 4 in Height. I hope you all like them. If you make one leave a comment and let me know what you think. If you download my cut file leave a comment! I work hard on creating them free for you.
Cartridge I used:
Plantin Schoolbook for ( Tag Box) Designed in Cricut DesignStudio. Use 12 X 12 mat and heavy cardstock or chipboard to cut out tag box.
Paper Doll Dressup (monster,cat,ghost) cut at 4 1/4 and (spider) cut at 3 1/4 inch.
Have a good day all!
Here is Download cut file.
Monday, October 12, 2009
Happy Thanksgiving Stair Step Card!
Click photo it will enlarge
Hi everyone,
Here is a Stair Step Card I made for Thanksgiving. This is my first Stair Step Card! This card is really fun to make. These cards may be done in landscape or portrait. Pick a theme and let your imagination run wild. I cut cardstock for the top of my card at 5 by 6 inch for the last step on my card and glue it to the card. I used cuttlebug embosser ( Swiss Dots) folder.
Scoring and folding Instructions:
1) Cut your cardstock to the size of 5 1/2 x 10 1/2 inch
2) Score your cardstock at 1 1/4 - 2 1/2 - 4 1/4, 6 and at 8 1/4 inch. Now fold .. making sure that the smallest(1 1/4 inch fold) is folded down.. this will be the front of your card. Look at my card, you can see how my card is folded down.
3) Choose a theme and decorate with die cut, stickers etc
Let me know if you like my card. Have a good day everyone!
Thursday, October 8, 2009
Happy Birthday Card!
Click photo it will enlarge
Hi all,
This Birthday Card was designed for Mojo Monday Madness Sketch #107 contest. Card size is 4 1/4 by 5 1/2. The happy birthday stamp is from the Dollar Tree Store.
Cartridge I used:
Mini Monograms for (scallop and circle)
Hi all,
This Birthday Card was designed for Mojo Monday Madness Sketch #107 contest. Card size is 4 1/4 by 5 1/2. The happy birthday stamp is from the Dollar Tree Store.
Cartridge I used:
Mini Monograms for (scallop and circle)
Wednesday, October 7, 2009
A Squirrel Shape Card!
Click on photo it will enlarge
Hi all,
The CuttleBug Challenges Be Inspired # 52 is to create a Halloween or Fall Card. Here is my card. This is a squirrel shape card I made. I welded this card in DesignStudio at 5 1/2 inch. I welded the base and blackout together and then I cut the layer for the card. I embossed the squirrel with Swiss Dots.
Cartridge I used:
Winter Woodland for (squirrel and nut)
Plantin SchoolBook for (envelope)
Have a good day all!
Monday, October 5, 2009
Breast Cancer Awareness Card! May God Be With You!
Click on photo it will enlarge!
Hi everyone,
This is for The Cuttlebug Spot challenge # 51: Pretty in Pink in Honor of Breast Cancer Awareness month. My card size is 4 1/4 by 5 1/2 inch. To make ribbon I used a small strip of pink foam sheet and added a pink brad. I embossed the card with D'vine Swirls folder and foam ribbon was embossed with Swiss Dots folder. Have a good day all!
Tuesday, September 29, 2009
Sweet Cupcakes For You Happy Birthday Card!!
Hi everyone,
I had to make a birthday card and this is perfect for the Chirper Challenge blog. The Chirper Challenge we had to use the word sweet in the card, scrapbook layout or what ever project we make. The card size is 8 1/2 by 11 inch cardstock, scored and folded. Here is my card.
Cartridge I used:
Doodlecharms ( cupcake border) cut at 3 1/2 inch and layers.
Plantin Schoolbook (Roly Poly letters) welded at 1 inch in DesignStudio.
Potpourri Basket ( Happy Birthday) cut at 2 inch
Now all I need is to make some homemade cupcakes. Have a good evening all!
Monday, September 28, 2009
Autumn Leaf Card!
Hi everyone,
This card is for The Cuttlebug Spot Challenge # 50: We are falling. This challenge you had to do a Fall Creation. Here is mine!
Cartridge I used:
I used Strectch your Imagination Cartridge ( Autumn card on page 42) fit to page will cut card at 5 inch on 8 1/2 by 11 inch cardstock and I cut layers and card frame at 5inch. The leaf is on page 48, I cut leafs at 1 3/4 inch and I cut the Silhouette leaf at 1 3/4 inch. I embossed the card with Swiss Dots folder and add some Fall ribbon and glitter glue. Have a good day all! :0)
Subscribe to:
Posts (Atom)