Hello all! Stopping in to share a video I made using Cricut DoodleCharms Cartridge. I made this video back in May and never posted the video.
Thanks for stopping by!
Showing posts with label Doodlecharms. Show all posts
Showing posts with label Doodlecharms. Show all posts
Sunday, October 16, 2016
Tuesday, December 17, 2013
Christmas Stocking!
Hello everyone!! Hope you are having a great week. We have 8 days left to get everything ready for Christmas. I have a stocking ornament and/or gift card, candy holder to share. This cut is from Cricut Doodlecharms Cartridge. I cut 2 stocking and glued outer edge together to create a pocket for candy cane and gift card.
 Here is the stocking hanging by a candy cane on a table Christmas Tree.
 Have a great week! Thanks for stopping by. :)


Wednesday, November 20, 2013
Jingle Bell Earrings with Card....and Comment Winner!!
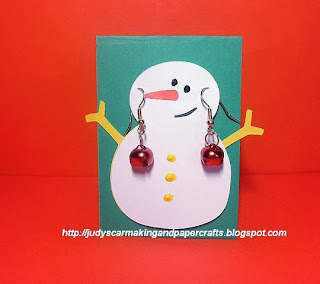
Hello friends and followers. Hope you are having a great day. Today I'm sharing a Christmas idea. I been working on these Jingle Bell earrings and cards for a few weeks now. These will be giving to Friends, Teachers and who ever else I can think of. Here is a VIDEO TUTORIAL on how to put earrings together. To make earring, I used small colored bells, Fish hook earring findings and 6 mm jump rings and jewelry pliers to put them together. Who said Rudolph the red nose reindeer couldn't wear earrings? :)
 Who said Frosty the snow man couldn't wear earrings? They both look so cute wearing earrings. The Earring card is 2 1/2 in by 3 in. The snowman and reindeer is cut from Cricut DoodleCharms Cartridge. I don't remember what size I cut the snowman and reindeer.
 Hanging out all together here. I have a lot more not shown in the picture.

 Have a great week. Thank you so much for stopping by! :)


Pam commented the most for October and most of November. Pam you can pick any (2) pairs and
I will mail them. Email me and let me know which (2) you would like to have mailed to you. :)

Wednesday, December 12, 2012
Decorate To Celebrate #40 - Christmas Party!!
Happy Wednesday . I hope you are having a wonderful day! It is time for another FUN challenge at Decorate to Celebrate!! For Challenge #40, we are asking you to create any project to be used as a party decoration (or party supply) for a CHRISTMAS PARTY!! Let's celebrate EVERYTHING WONDERFUL ABOUT MISTLETOE, HOLLY, AND THE NATIVITY with your table decorations, party banners, pennants, yard signs, cupcakes, party favors and more!!
 For my Christmas Party project I created these cute Reindeer and Santa tea light party favors. I wrapped them in clear cello bags and tied handmade note cards and store bought tags to them. Tie a ribbon around these tea light and they can be used as a tree ornament. Hot glue a piece of felt and a pin to the back of these and they can be worn on a shirt:)This is my very own tea light idea with the Cricut DoodleCharms Cartridge!! Here is a close up of Rodolph the red nose Reindeer.
 Here is a close up of the Santa tea light.
 Here is a side view of Rudolph.
 Here is Rudolph lite up in the dark! Click HERE to see Santa lite up in the dark. Now it is your turn to create a Christmas Party decoration or supply!! You can link your project up HERE.
 Have a great day! Thank you for stopping by and LOOKING;)


Friday, November 30, 2012
Santa Tea light Project!!
Happy Friday! I hope you all had a great week. Here is another altered battery operated tea light project I made. I used the Santa cut from Cricut DoodleCharms Cartridge to make this tea light look like Santa. I made a lot of different altered tea light with the images on this cartridge. This is my very own idea with this cartridge. I did not see this on any ones blog.
 I made a note card to go with the Santa tea light. Tie a piece of ribbon around this Santa tea light and it can be used as a tree ornament. It also can be worn on a shirt too. Just hot glue a piece of felt and a pin on back and Santa can lite up on your clothes:)
 This is the back of tea light.I punched a small hole in scallop circle so it can be turn on and off.
 Here is Santa lite up in the dark!!
 Hope you like my Santa tea light:) Have a great weekend. Thank you for stopping by. :)


Monday, April 16, 2012
Card Outreach Challenge!
Hello everyone. Here is a card I made for Cooking with Cricut Challenge #81 Outreach ("Thinking of You" cards for a 6 yr. old and a 13 yr old girls battling cancer). I will be mailing one of these cards to Cooking with Cricut Design Team member Madison and the other card to the other address.
 The scallop image is from A Child's Year cartridge and is on page #49 of the handbook. This bear image is on Doodlecharms Cartridge and is on page 105 of handbook.
 Here is a close up of the bear.
 Have a great week all. Thank you for stopping by:)
 The scallop image is from A Child's Year cartridge and is on page #49 of the handbook. This bear image is on Doodlecharms Cartridge and is on page 105 of handbook.
 Here is a close up of the bear.
 Have a great week all. Thank you for stopping by:)
Wednesday, March 21, 2012
3D Egg ornament Tree!
Hello everyone. Hope your having a great day! Here is a paper Easter decoration. I created this 3D tree with Cricut Stretch your Imagination Cartridge. I cut the tree out 4 times on page #47 and scored down middle and hot glued them together. I cut the bottom of tree across with scissors to get it to stand up on table.
 The egg is from DoodleCharms Cartridge and is on page #89. I cut the egg out 6 times and scored down middle and hot glued them together. I added a small piece of sheer ribbon in center of egg for hanging on tree. I seen this 3D egg on another blog but I can't remember where I seen it.
 Have a great week all. Thank you for looking!
 The egg is from DoodleCharms Cartridge and is on page #89. I cut the egg out 6 times and scored down middle and hot glued them together. I added a small piece of sheer ribbon in center of egg for hanging on tree. I seen this 3D egg on another blog but I can't remember where I seen it.
  Have a great week all. Thank you for looking!
Monday, November 28, 2011
My Memories Suite Card!!
Hello everyone. I hope you all are having a great day. Here is a card I made with the My Memories Suite Scrap booking software. I used my printer to print out this card from the My Memories Suite software. I made this card for the Cooking with Cricut Challenge #61 Bible Quote or Verse for National Bible week. I'm thinking about putting this card in a frame and giving this to my friend :)
 The heart border at the bottom of this card is from the Cricut DoodleCharm Cartridge and is on page 85 of handbook.
 The card at bottom was created with My Memories Suite Digital Scrap booking software only. Here is my giveaway link if you want to try to win the My Memories Suite scrap booking Software. Winner will be able to download software from My Memories Suite Web site. Everyone is welcome to enter giveaway. If you want to purchase one you can use discount code STMMMS15941 to get $10 of My Memories Suite Software. Click on My Memories Suite button on my side bar and it will take you to their web site.

Have a great week all. Thank you for stopping by:)
 The heart border at the bottom of this card is from the Cricut DoodleCharm Cartridge and is on page 85 of handbook.
 The card at bottom was created with My Memories Suite Digital Scrap booking software only. Here is my giveaway link if you want to try to win the My Memories Suite scrap booking Software. Winner will be able to download software from My Memories Suite Web site. Everyone is welcome to enter giveaway. If you want to purchase one you can use discount code STMMMS15941 to get $10 of My Memories Suite Software. Click on My Memories Suite button on my side bar and it will take you to their web site.
Have a great week all. Thank you for stopping by:)
Monday, April 11, 2011
A cute bunny card!
Hello friends. I hope you had a fabulous day. We had 80 degrees weather here today and lots of sunshine! I thought summer had arrived but it suppose to get a lot cooler tonight. I was over at Beccy's Place today and I seen her cute bunny image and I had to make a card with this bunny. Beccy's Place has so many cute images. If you haven't done so already go visit her blog. She has a lot of talent creating these images and she shares them for free.
 Here is a close up. This bunny is super cute! The basket and flowers are from the Cricut Doodlecharm Cartridge. This is a old cartridge but one of my favorite cartridges:)

This is for these challenges
Creative Cutter Room challenge to use a circle, glitter, yellow and ribbon.
Cooking With Cricut bunny hop to create a Easter project.
Have a fabulous week and thanks for stopping by:)
 Here is a close up. This bunny is super cute! The basket and flowers are from the Cricut Doodlecharm Cartridge. This is a old cartridge but one of my favorite cartridges:)
This is for these challenges
Creative Cutter Room challenge to use a circle, glitter, yellow and ribbon.
Cooking With Cricut bunny hop to create a Easter project.
Have a fabulous week and thanks for stopping by:)
Monday, March 28, 2011
Basket of flowers!
Hello friends! I hope you week is starting off good and you are well. Here is a recycled project. The box I used for this project was a box filled with chocolate candy. This was a Christmas present from my friend. I keep the box after all the chocolate was gone and I adhered some pretty pattern paper to it:). This box was too nice to trash it. Don't you think so too? I used Mod Podge Gloss -Lustre to adhered paper to box and I painted the Mod Podge all over the pattern paper to give the paper a glossy shine:) I used gems, gold crafts wire, brass finished fasteners and puffy paint to embellish flowers and basket. I used pop dots to give the flowers and basket some dimension.

The pattern paper is from the Yearbook Paper pad. This paper is so pretty! The solid paper is Recollections card stock. I used Doodlecharms flower on page#91 and the basket is on page #116. flowers cut @ 2 inch and basket @ 2 7/8 inch. I used Design Studio so I could cut them to fit the box.

Here is the box before I decorated it and the top is after:) I love the outcome of this project! I just love it:)
This project is for these challenges:
Fantabulous Cricut Challenge #53 to use a Spring time theme.
Paper Playtime Challenge #42 anything goes.
Jitterbuggin Challenge to add a Cricut flower to project.
Frosted Designs challenge to reuse or repurpose things you already have around the house!
Have a fabulous week all and thanks for stopping by :)

The pattern paper is from the Yearbook Paper pad. This paper is so pretty! The solid paper is Recollections card stock. I used Doodlecharms flower on page#91 and the basket is on page #116. flowers cut @ 2 inch and basket @ 2 7/8 inch. I used Design Studio so I could cut them to fit the box.

Here is the box before I decorated it and the top is after:) I love the outcome of this project! I just love it:)

This project is for these challenges:
Fantabulous Cricut Challenge #53 to use a Spring time theme.
Paper Playtime Challenge #42 anything goes.
Jitterbuggin Challenge to add a Cricut flower to project.
Frosted Designs challenge to reuse or repurpose things you already have around the house!
Have a fabulous week all and thanks for stopping by :)
Thursday, December 2, 2010
Christmas reindeer bag!
Hi everyone! I hope you all are having a great Thursday :) It is very cold here where I am today. Here is a cute gift bag I made today the reindeer is from the Cricut DoodleCharms Cartridge. This reindeer is so cute. I used my Gypsy to cut reindeer at 6.00 height. I bought the bag from the $1 store 3 for a dollar and googly eyes, pom pom for the nose are from $1 store. I used glitter glue and puffy paint on the reindeer.

This bag is the cutest ever :) My Daughter will love this reindeer bag and she will want to give one to everyone :)
This bag is for these Challenge:
Frosted Designs challenge: Glitter
Made by Momo Challenge #17 to make a treat box or bag :)
Thanks for stopping by everyone and have a great day:)

This bag is the cutest ever :) My Daughter will love this reindeer bag and she will want to give one to everyone :)

This bag is for these Challenge:
Frosted Designs challenge: Glitter
Made by Momo Challenge #17 to make a treat box or bag :)
Thanks for stopping by everyone and have a great day:)
Sunday, September 19, 2010
Halloween easel card!
Hi everyone! Happy Sunday to you all! I hope you all are having a great Sunday! This is an easel card I made. I used the grey Metallic gel pen from Cri-kits to draw the spider web. I wanted to create a Halloween card with these gel pens and here it is.
Card size is 6 x6 inches closed. My favorite card to make are these easel cards. This card was easy to make and I like the way it turned out. If you want to see how a easel card is made see this tutorial video link here.
Thank you all for stopping by!
Cartridge used:
Paper doll dress up (web) on pg # 49 drawn at 6 1/2 inches.
Doodlecharms (spider) on pg# 121 cut at 1 1/2 inches.

Card size is 6 x6 inches closed. My favorite card to make are these easel cards. This card was easy to make and I like the way it turned out. If you want to see how a easel card is made see this tutorial video link here.

Thank you all for stopping by!
Cartridge used:
Paper doll dress up (web) on pg # 49 drawn at 6 1/2 inches.
Doodlecharms (spider) on pg# 121 cut at 1 1/2 inches.
Tuesday, March 23, 2010
Easter egg shape card... with cut file!
Click to see close up!

Hi everyone! Here is random selected winner for butterflies I posted on Saturday! The random selected is Terry# 2. Terry email me your info so I can mail your butterflies. Here are the egg hunt cards I sent out for my daughters Easter Egg hunt get together. Here is a Easter egg .cut file I welded in Cricut Designstudio. This cut file has 2 cards on the file. This card will fit in to an A2 envelope. You need 8 1/2 by 11 inch card stock for 2 cards. I used zig zag scissor and cut egg in half and layed egg card in another color and I used a hole puncher and punched out small dots for bottom of egg. I used glitter pen to color bunnyegg and glitter glue for glitter dots at top of egg. I used a white pen and stitched around bottom of egg. You all have a great day!
Cartridge used:
DoodleCharms ( egg) cut on pg #89.
Stretch your Imagination ( bunnyegg)cut on pg #67.
Here is the Cricut DesignStudio .cut file.
Tuesday, March 16, 2010
A votive candle holder box.. with cut file!
My 5 year old Daughter is my biggest fan on these kind of projects. She has been talking about this bunny box for a few days now! When she seen all the bunny boxes ..she was clapping her hands and yelling I love them Momma! She said " Can I have mine now"! Click photo to enlarge.
I made the votive candles and they have a vanilla scent. Yes I make candles too!
I made lots of bunny boxes!
Happy Tuesday everyone! Here is a .cut file box I created in Cricut DesignStudio for a friend of mine. She wanted a box that could hold (2) votive candles and holder. I cut the boxes out for her and scored them and she is finishing them. This is what I came up with. I made some of the boxes and I added candy and lip gloss in some of my boxes and I added some votive candles in some of my boxes for my nieces,sisters and friends for Easter. I didn't spend alot of time making these boxes. Why spend alot of time making them when they may throw the box away. I added the .cut file if you all want to make them. This box can be used for many occasion. Change the bunny cut and add ballons for birthday etc. Enjoy making them! You all have a nice week!
Cartridge used:
Plantin SchoolBook (to make box).
Doodlecharms to cut out(bunny).
Here is the Cricut DesignStudio .Cut file.

I made the votive candles and they have a vanilla scent. Yes I make candles too!

I made lots of bunny boxes!

Happy Tuesday everyone! Here is a .cut file box I created in Cricut DesignStudio for a friend of mine. She wanted a box that could hold (2) votive candles and holder. I cut the boxes out for her and scored them and she is finishing them. This is what I came up with. I made some of the boxes and I added candy and lip gloss in some of my boxes and I added some votive candles in some of my boxes for my nieces,sisters and friends for Easter. I didn't spend alot of time making these boxes. Why spend alot of time making them when they may throw the box away. I added the .cut file if you all want to make them. This box can be used for many occasion. Change the bunny cut and add ballons for birthday etc. Enjoy making them! You all have a nice week!
Cartridge used:
Plantin SchoolBook (to make box).
Doodlecharms to cut out(bunny).
Here is the Cricut DesignStudio .Cut file.
Tuesday, March 2, 2010
A Cupcake Birthday Card and free .cut file

Hi everyone! I hope you all are having a good week so far. Here is a cupcake shape card I welded in Cricut DesignStudio. This is my card for Bitten By The Bug 2 challenge. This challenge you have to create a cupcake card from Celebrations or DoodleCharm Cartridge and Just Buggin Challenge #27 use a card feature from any cartridge .I used the cupcake from DoodleCharm cartridge. To make this card I used (2) 12 x 12 cardstock. I added my .cut file if anyone wants to make one. Have a good week everyone!
Cartridge used:
DoodleCharms (cupcake) on page #108.
Here is the Cricut DesignStudio .cut file.
Thursday, October 29, 2009
Trick or Treat Layout...With Cut File!
Click photo to enlarge
Hi everyone, This is a Halloween Layout I made and welded in DesignStudio. If you have the cartridge I used you can download my cut file and make one. I hope you all like it! I will add the pitures later on.
Cartridge I used:
Plantin Schoolbook for (letters) welded and cut at 1 1/2 inch.
Stretch your Imagination for (spider and pumkin) cut one spider 2 1/2 inch and layers and one pumkin 3 1/2 inch and layers.
Doodlecharms for (Spider) cut one spider 3 1/2 inch and hit shift and cut one spiders. I used a silver glitter gel pen and pen stitch around the letter and picture area. My pen stitching is all over the place "lol". I added black and silver spider web ribbon and added black seed beads for spiders eyes and nose
Here is the download cut file! Enjoy
Tuesday, September 29, 2009
Sweet Cupcakes For You Happy Birthday Card!!


Hi everyone,
I had to make a birthday card and this is perfect for the Chirper Challenge blog. The Chirper Challenge we had to use the word sweet in the card, scrapbook layout or what ever project we make. The card size is 8 1/2 by 11 inch cardstock, scored and folded. Here is my card.
Cartridge I used:
Doodlecharms ( cupcake border) cut at 3 1/2 inch and layers.
Plantin Schoolbook (Roly Poly letters) welded at 1 inch in DesignStudio.
Potpourri Basket ( Happy Birthday) cut at 2 inch
Now all I need is to make some homemade cupcakes. Have a good evening all!
Friday, September 25, 2009
Ho Ho Ho! Merry Christmas Card!

Hi everyone,
Happy Friday to you all! It's very cloudy where Im at. This is a simple and easy Christmas card to make. Santa climbing over the fence. I used white cardstock and cut out all the cuts. I colored in the cuts with my colored markers. Card size is a 8 1/2 by 11 inch cardstock scored and folded.
Cartridge I used:
Potpourri Basket (Fence) cut at 2 inch. I cut 2 of the fence.
DoodleCharms (Santa) cut at 3 inch and cut layers.
Joys of the Season (mittens) cut at 1 1/4 inch.
Wild Card (letters) welded together in DesignStudio at 1 1/4 inch.
This card was really easy to make and it did not take a long time to finish. I hope you all like it. Have a good weekend all!
Wednesday, September 16, 2009
Happy Halloween Decoration!!
 CLICK ON PHOTO'S THEY WILL ENLARGE!
 Trick or Treat Confetti
Hi all,
The Cuttlebug Spot, Challenge #48: is confetti creation. Here is a Halloween Decoration I made. I made this with a frenches fried onion can, good use for that can! I used the Plaid Mod Podge Gloss-Lustre over can black cardstock and all cuts to make it glossy.
Cartridge I used:
Paper Doll Dress Up (witch)cut at 4 inch
Strectch your Imagination (pumkin and spider) cut at 4 inch. I used the blackout feature and layers.
Doodlecharms (spider) cut at 1 inch. The spider on can.
Plantin SchoolBook (shadow feature for letters) I welded the letters in Design Studio at 1 1/4 inch.
I used the Cuttlebug Embosser and embossed the confetti (Swiss Dots).
I hope you all like it. Now lets get busy and make a project with all those fried onion empty cans! LOL. Have a good day all! :0)
Sunday, August 2, 2009
Mothers are real angels card!

Hi everyone,
This week over at the Chirper Challenge is to "Let's get in shape"! The challenge was to create a shape card or layout. I did a shape card I always wanted to do a shape card, but I never made one. I made this card for my Mom she always been there when I needed her no matter what. My Mom will always be my angel! I picked the globe from the Doodlecharms. I welded the base and blackout of the globe in DesignStudio at 6 1/2 inch and I cut the globe out on a 12 x 12 inch of purple textured card stock. I pushed the shift key on the cricut machine and cut the globes top with pattern paper. I cut (2) blackouts in pink card stock for the inside of card at 6 1/2 inch. I used the Joys Of The Season Cartridge and cut the angel at 3 inch in pink card stock and cut layers for angel in white card stock and colored it in with pencils and blending chalk. I used some buttons, gems and ribbon. Have a nice Sunday all!
Subscribe to:
Posts (Atom)