Wednesday, December 25, 2013

Merry Christmas 2013!!!

Merry Christmas to you all! Have a wonderful day with your Family and Friends! :)


Thank you for stopping by! :)

Thursday, December 19, 2013

Christmas Word Art Card!

Happy Thursday! Hope you are having a great week. Can you believe Christmas is only 6 days away. :) Here is a card, I created for Word Art Wednesday Challenge #111 - Anything Goes. I had to make some card with this week's beautiful scripture/word art file. :) Hope you adore my cards as much as I do!!! Click photos to see a little larger.
 
 I used My Memories Suite Scrapbook Software to create this card. The frame and flowers is from a kit called (Santa). My Memories Suite Banner is located on my sidebar.
Have a great day! Thanks so much for stopping by and looking. :)

Wednesday, December 18, 2013

Reindeer Tag Printable!

Hello friends! Hope you are having a great day. We have 7 days left for Christmas Day! My daughter is so ready to tear open some presents.:) Here is another printable I created. These reindeer tags was created for some Oreo cookie gifts to give Coworkers, Friends, Neighbors and Teachers. These reindeer tags make the bag look so cute!! What do you think? I created some Merry Christmas tags.
I made some Reindeer Food tags. I wrapped up a unopened pack of Oreo cookies in clear cello bag and tied the tag on top of bag. I used double sided tape to put the reindeer face on front of clear bag.:)
Here is a close up of the tags and reindeer face. Reindeer face measures from top to bottom 3 3/8 inches and from side to side of face 2 3/4 inches. Merry Christmas and Reindeer Food tag measures 3 inch in diameter. These tags can be used for any Christmas treat.
Thanks for stopping by. Have a wonderful week.

Tuesday, December 17, 2013

Christmas Stocking!

Hello everyone!! Hope you are having a great week. We have 8 days left to get everything ready for Christmas. I have a stocking ornament and/or gift card, candy holder to share. This cut is from Cricut Doodlecharms Cartridge. I cut 2 stocking and glued outer edge together to create a pocket for candy cane and gift card.
Here is the stocking hanging by a candy cane on a table Christmas Tree.
  
 Have a great week! Thanks for stopping by. :)

Wednesday, December 11, 2013

Decorated Christmas Tree 2013!!

Hello everyone! Hope you are having a wonderful day. I've been busy here and I know you have been busy too. Today, I'm sharing a photo of my Christmas Tree. I decorated the Christmas Tree 5 days ago, but didn't have time to post photos of it on here. Had some free time today and here it is. My daughter wanted to decorate the tree like this with the red ribbon and beads going up and down on the tree. I  really like how it looks and my daughter does too!! Here is a close up of  my Christmas Tree without the sparkling and shining. 
Here is a close up of the Christmas Tree sparkling and shining! ;) Hope you like looking at my Christmas Tree as much as I do!! 
I had to make this photo of the Christmas Tree sparkle and shine too. I love this time of  year and love to decorate. :) Hope you like my Christmas Tree!!
 Have a wonderful rest of the week. Thank you so much for stopping by!  :)

Thursday, December 5, 2013

Christmas Nativity Card!

Happy Thursday! Hope you are doing great and having a fabulous week. Are you getting everything ready for Christmas? This year I'm ahead of shopping for presents. All the presents  bought so far I have them all wrapped up. My daughter and I going to bake some Christmas cookies this weekend! I love to bake and my daughter does too. :) How about you do you bake cookie for Christmas? Here is a Christmas card, I made to mail out to Family and Friends. My cards are already in the mail. Last year everyone got my cards late. Click picture to enlarge.
This Nativity images on this card is from Cricut  Inspired Heart Cartridge. I love this cartridge. This is one of my favorite Cricut Cartridge! :) Here is The Real Meaning of Christmas  You tube video link, if you have some time to watch it.
Have a wonderful week. Thank you for stopping by! :)

Monday, December 2, 2013

Christmas Word Tree!

Happy December! We have 23 days left till Christmas!! Hope everything is going great for you. For me, I've been very  busy working and trying to get everything ready for Christmas Day . Here is a Christmas Word Tree printable I created. Christmas is all about these words. ;) Click picture to enlarge.
The  8 x 10 inch frame and sequin was purchased from the dollar tree store. I painted the frame with green acrylic paint. The Christmas word tree was printed out on 8 1/2 x 11 inch white card stock. I cut the word tree out with scissors and adhered it to the 8 x 10 inch piece of Christmas pattern paper. I adhered some sequin to the Christmas word tree and add some glitter to star and pot at bottom of the tree. I glued  sequin to  the Christmas tree to decorate it. I love the outcome of this project. This will look beautiful on a table, mantle or shelf. 
Thank you so much for stopping by! Have a wonderful week. :)

Wednesday, November 27, 2013

DTC Challenge #65: Christmas Tree!

Happy Wednesday all. We are having a fun challenge at Decorate to Celebrate. I hope you join us in this fun challenge .For Challenge #65, we are asking you to create any project having to do with CHRISTMAS TREES!! It can be tree decorations for a party, your home or even pictures of your Christmas tree!! So get out your cameras and snap pictures of your tree to share!! :)

 Link up your project over at Decorate To Celebrate before 11:59pm (EST) on Tuesday, December 10th to be eligible for YOUR CHANCE to WIN Rhonda's Mini Album pictured on blog!!
For this  Christmas Tree Challenge.  I decorated this little table  Christmas  Tree. I purchased the Tree, star garland, bell garland, colored 20 light set, table mat and this singing motion bird all from the dollar Tree Store. All items cost $1.00 dollar each. It looks really beautiful lite up:)
 
Hope you have a Happy and safe Thanksgiving Day. Thank you so much for stopping by! :)

Wednesday, November 20, 2013

Jingle Bell Earrings with Card....and Comment Winner!!

Hello friends and followers. Hope you are having a great day. Today I'm sharing a Christmas  idea. I been working on these Jingle Bell earrings and cards for a few weeks now. These will be giving to  Friends, Teachers and who ever else I can think of. Here is a  VIDEO TUTORIAL on how to put earrings together. To make earring, I used small colored bells, Fish hook earring findings and 6 mm jump rings and jewelry pliers to put them together. Who said Rudolph the red nose reindeer couldn't wear earrings? :)
Who said Frosty the snow man couldn't wear earrings? They both  look so cute wearing earrings.  The Earring card is 2 1/2 in by 3 in. The snowman and reindeer is cut from Cricut  DoodleCharms Cartridge. I don't remember what size I cut the snowman and reindeer.
Hanging out all together here. I have a lot more not shown in the picture.
 Pam commented the most for October and most of November. Pam you can pick any (2) pairs and
 I will mail them. Email me and let me know which (2) you would like to have mailed to you. :)

Have a great week. Thank you so much for stopping by! :)

Sunday, November 17, 2013

Jar Shape Card!

Happy Sunday. Hope you are having a great day. I Have a few jar shape cards to share. Used a jar template to create these cards. This is my first time making a jar shape card. Here's a Get Well Card.
Here's a Birthday Card. These flowers are so beautiful. My friend gave me the flowers. I don't know where she purchased them from.
Here is a close up.
Thanks for stopping by. Have a wonderful week. :)

Wednesday, November 13, 2013

DTC Challenge #64:Thanksgiving/Fall Part 2!

Hello! I hope you are having a wonderful Wednesday. We are having a fun challenge over at  Decorate to Celebrate. For Challenge #64, we are asking you to create any project to be used as a party decoration (or party supply) for a THANKSGIVING or FALL PARTY or CELEBRATION!! Let's celebrate EVERYTHING WONDERFUL about TURKEYS, PILGRIMS, FAMILY, BEING THANKFUL and MORE with your table decorations, party banners, pennants, yard signs, cupcakes, party favors and more!! :)
 For my project I decided to make some  turkey place cards. The turkey printable was created by me and can be downloaded below! This is my Thanksgiving gift to you. ;) I'm so GRATEFUL to have you all as  friends and followers of my blog!! The cute felt 3D pumpkin table decorations I purchased from the Dollar Tree Store. There are six 3D pumpkins in a pack  for a dollar.
Direction for turkey printable. Print out on a 8 1/2 inch by 11 inch piece of white card stock. Cut them out with scissors.These turkeys can be used on cards or as a tag for a gift! Here is another  great idea how to use printable. Create a paper wrapping long enough to wrap around a candle, candy bar, apple or orange. Adhere turkey to front of wrapping. Stamp a sentiment or person name on turkey. This  turkey  printable was created by Judy. You can download the free turkey printable for personal, non commercial use only.  Here is the JPG turkey printable to download. Here is the PNG turkey printable to download. If you download printable. Post project on your blog or email me a photo on how you used the turkey printable. I would love to see how you used the printable.

  Enjoy the free turkey printable all. Thank you so much for stopping by. Have a wonderful week. ;)

Monday, November 11, 2013

A Digital Scrapbook page and Comment Winners!

Happy Monday! I hope you all had a great weekend. Saturday I had to work on my job. Sunday I spent the day with my two favorite little ones! :) Here is a  digital scrapbook page I created of my daughter, grandson and me. My grandson is getting so big. He is seven months old now. This page was created with My Memories Suite Digital Software.

The comments chosen for the table decoration from  HERE is #1 and #3. The winner is Rhonda and Pam. Ladies email me you address and I will send the table decoration to you.

Have a wonderful week. Thank you so much for stopping by! :)

Thursday, October 31, 2013

Happy Halloween!!

Happy Thursday day all! Hope you and yours have a safe and Happy Halloween. Play slide show to see all pictures of my daughter and I. This is how we dressed up for Halloween 2012.
Click to play this Smilebox slideshow
Create your own slideshow - Powered by Smilebox
This slide show was created with Smilebox. 

Wednesday, October 23, 2013

Cute Baby Digital Scrapbook Page!!

Hello everyone. I have another cute digital scrapbook page to share today. I'm sharing a page I created of my daughter and grandson. My two favorite little ones! If you don't already know, I became a grandma in April! The first picture is my daughter holding her nephew. My daughter was so proud that day holding her nephew for the first time. :) The second picture is my grandson outside in his swing. My little man loves to swing! :) Look at that happy face. He is so precious and adorable. This page was so easy to created with My Memories Suite Software. I can print this out at home or take it to a photo printing store. I always take it to a photo store to print it out. This page is going into a 8 x 8 inch album I am creating for my daughter.
My Memories Suite FREE TREAT offer ends today October 23, 2013 @ 11:59 PM (Eastern Time). Go download it for free before it's too late. Click on blue link to read original post. Thanks for stopping by. Have a super fabulous day! :)

Monday, October 21, 2013

A Halloween mini album from a friend!!

Hello everyone. Hope you had a wonderful weekend. Look what I received on Friday through the mail. I was so surprised to get this mini album. I wasn't expecting any packages from anyone!! Can you guess who sent it? Yep you guessed it! This is handmade by Rhonda @ Scrap Happens with Rhonda . She makes some really awesome handmade mini albums. I love all her creations posted on her blog. If you never visited her blog . You should go and check it out! I made a 37 second video of the mini album so you could see all 7 pictures. This mini is so super cute! Watch video below.
Thank you again Rhonda for this mini album. I love it ! :) Thanks everyone for stopping by. Have a wonderful week! :)

Thursday, October 17, 2013

A Free Treat For All My Followers!!!

Hello friends. Hope your having a wonderful day!!! I'm super excited to be offering My Memories Suite v4 to my followers for FREE! This is only for one week. LAST DAY TO DOWNLOAD IS OCTOBER 23,2013 at 11:59 PM. Make sure you copy and paste FreeTreatNH131 in the promo code field before checking out to get your FREE copy of My Memories Suite 4 (this code is only for the downloadable version). Get it now. What are you waiting for. Don't delay get it free today. Click on blue link above and download it.  My code is only available to you Oct 17,2013 to Oct 23,2013. Let me know if you have any questions.

Here is a page I created with My Memories Suite. This is my daughter playing at the lake. What a beautiful Summer day. The sky was so blue and the sun was so bright. My daughter had so much fun playing that day.
Enjoy your free copy all!! Have a great week. Thanks for stopping by! 

Wednesday, October 16, 2013

DTC Challenge #62: Ghostly Goodies ( Halloween Party-Part 2)

Hello friends! Hope you are having a wonderful Wednesday. I'm so glad you stop by for my children party idea. Hope you join us over @ Decorate to Celebrate. If you join in the fun challenge. You have a chance to win Rhonda's handmade mini album!!! Let's get this party started!!! For Challenge #62, we are asking you to create any project to be used as a party decoration (or party supply) for a HALLOWEEN PARTY or CELEBRATION!!  Let's celebrate EVERYTHING WONDERFUL about GOBLINS, BATS, SCARY CATS and MORE  with your table decorations, party banners, pennants, yard signs, cupcakes, party favors and more!!
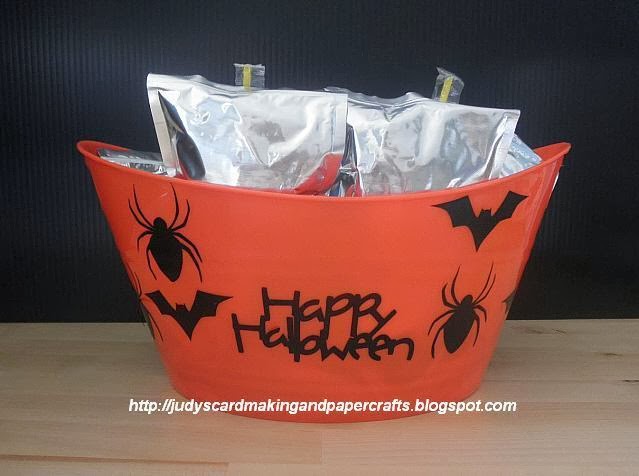
For my project, I decided to decorated a orange bucket with Cricut black vinyl. The bat, spider and Happy Halloween images was cut out with the Cricut machine on black vinyl. All these images is from Cricut Wild Card Cartridge.
The orange bucket and bat party favors was bought from the Dollar Tree Store. These bat favors come with six in a bag and cost only $1.00. You can't beat this price any where. These are the one I will be having at my daughter Halloween get together this year. I usually make handmade party favors, but I don't have the time to do them this year. These bat party favors are so cute. I put candy corn in the bags.
Hope you stop back tomorrow. I have a FREE TREAT for all of my followers!! This free treat will be offered between October 17 and will end on October 23,2013. Stop back tomorrow to see what the free treat is. :) Thanks for stopping by and looking. Have a wonderful week!!

Monday, October 14, 2013

Witch on Broom Card!!

Hello everyone! Hope you had a great weekend. I had a very restful and relaxing weekend:) All I did on Saturday was go shopping with a friend!!! I went to Olive Gardens to eat with My Hubby and Daughter on Sunday. That was so nice of my hubby taking us out. :) I was so happy I didn't have to cook. ;) Here is a Halloween card I made for a few card challenges. My daughter told me this witch card is very scary and spooky. Had this card standing up on my desk and my daughter put it in my card box. I guess she is afraid of this witch card.
Here a side view. This card was embossed with Darice Embossing Essentials (Picket Fence). I took Inkadinkado Blending Chalk to color in embossed picket fence to make it look black. The witch is from Cricut A Child's Year Cartridge. The moon is a circle from Cricut Plantin SchoolBook Cartridge. I took black chalk and colored around edge of moon. Happy Halloween is a $1.00 Studio g clear stamps purchased from Michaels store.
Thanks for stopping by. Have a wonderful week!

Wednesday, October 2, 2013

Challenge #61: Witch's Brew (Halloween Party - Part 1)

Happy October All. Can you believe it is October already! I love this time of year. We are having a Halloween challenge over at Decorate to Celebrate. I know a lot of you are creating some fun things for those Halloween party you will be hosting or going to. I hope you come and link them up. For Challenge #61, we are asking you to create any project to be used as a party decoration (or party supply) for a HALLOWEEN PARTY or CELEBRATION!!  Let's celebrate EVERYTHING WONDERFUL about WITCHES, GHOSTS, PUMPKINS and MORE  with your table decorations, party banners, pennants,yard signs, cupcakes, party favors and more!!
For this challenge, I created  this Bat Wine Bottle Gift Bags. This will be given to my friend who is hosting a Halloween party. I made this out of black craft felt and black glitter stiffened felt . I cut two black 7 inch by 12 inch piece of felt and sewn the sides together. I cut one black 5 1/2 inch circle and sewn to create bottom of wine bag. The seams  on side and bottom are sewn at 1/4 inches. Turn wine bag on right side out. I folded top of bag over about a 1/2 inch and sewn around to front.  I put a piece of ribbon in the sewn part to create a tie for bag. The bat ears  are  triangles and eyes are circles I cut them out  with  scissors. I glued the eyes, ears and wing on bag.  I used stiffened black glitter felt for the bat wings. The bat wing template is  HERE.
Do you like my bat wine bottle gift bag?  I will love to hear what you have to say. Leave a comment below. I have many more wine bottle gift bags  ideas to create. Linking this project here. Thanks for stopping by and looking. Have a wonderful week.

Tuesday, October 1, 2013

I have a Winner!

Happy Tuesday! I hope all is having a great week! I have a winner for my handmade angel card and bracelet giveaway. The winner is.........................................................................
Congratulations Judy!!!! Email me your address so I can mail these to you!!! Thanks to all who left a comment on post. Have a great week. :)

Thursday, September 26, 2013

Fall Scarecrow card!

Happy Thursday. Thanks for stopping by. I have a fun Fall card to share today. This is my first Fall card for this year. I didn't have a Cricut Cartridge with a scarecrow cut on it. I created one with Cricut Everyday Paper Dolls Cartridge. This is the Farmer image cut on page #68 of the handbook. I used the same farmer cut here to create a scarecrow on my daughter Fall Harvest Layout.
The pattern paper is from YearBook Paper Pad and yellow and orange solid cardstock is Recollections. I cut a small piece of tan corrugated paper to glue the scarecrow on it. Embellished the scarecrow with a rub on face, yellow buttons, leaf gem and natural raffia. Fall is from Xyron Design Runner. The Design Runner Disk is called Ocassions. Here is a close up! Do you think it looks like a scarecrow?
Thank you for stopping by. Have a great week. :)

Wednesday, September 25, 2013

Owl project!

Hello friends. I hope you are doing fine. I'm been doing fine here. I'm so glad it is Fall. I love this time of year. I love all the Fall colors I been seeing on blogs I visit. I need to start creating some Fall colored projects too. I have a cute owl project to share today. This project was created on a 8 x 10" inch stretched canvas.To paint this project on the stretched canvas, I used Apple Barrel Acrylic paint by PLAID.  The owl was stenciled on with Plaids Animal Icons stencils. This is a reusable pack with 46 different animals stencils  in it. The branch with hearts was hand drawn with a pencil and painted in with paint. I used a pencil for the letters and then went over it with red paint. :)
I had so much fun creating this owl project. I never stenciled and painted on stretched canvas before. Many more stretched canvas projects to come. Keep a look out for them. Know telling what you will be seeing stenciled and painted on stretched canvas next time. ;)
Here is a close up. Hope you like looking at my creations. Click here to see another one of my Owl Always Love You Project!
Thanks for stopping by. Have a great week!! :)

Wednesday, September 18, 2013

DTC Challenge #60: Over the Hill Party!!

For my  bracelet and card giveaway click HERE

Happy Wednesday. I hope you are well and having a wonderful week. it's time for another challenge over at Decorate To Celebrate. For Challenge #60, we are asking you to create any project to be used as a party decoration (or party supply) for an OVER THE HILL PARTY or CELEBRATION!!  Let's celebrate EVERYTHING WONDERFUL about GROWING OLD, HAVING TOO MANY CANDLES, FINDING THE HUMOR IN OLD AGE and MORE  with your table decorations, party banners, pennants, yard signs, cupcakes, party favors and more!!
For this challenge I made a delicious chocolate cake with cake banner. This cake is 9 inches round  with two layers. You can find the cake recipe right HERE.
If you want the Over The Hill cake banner printable I created.  Right click the free printable below and save on your computer. Then go back to where you saved it. Print out with your printer on a 8 1/2 inch by 11 inch white cardstock. Cut out with scissors, punch holes, run twine or string through the holes you punched on banner and assemble banner on your cake. I used drinking straws to hold up banner on cake. :) You can use  the banner for personal, non commercial use only.
Thanks for stopping by. Have a wonderful week! :)

Thursday, September 12, 2013

Angel Card with Angel Charm Bracelet Giveaway!

Hello! I have a CAS angel card with angel bracelet to share with you all today. This angel cut is from Cricut Inspired Heart cartridge. I welded the circle cut with my Gypsy to create a card. The bracelet was made with white and clear seed beads. I made the bracelets in a size 8 inch and 7 inch. If you are a follower of my blog and you want to win these bracelets. Leave a comment on this post. I will pick one follower to win a size 8 inch and 7 inch bracelet with angel card. I will choose winner on September 30,2013.
Here is the front of charm. The front has a angel on it.
Here is the back of charm. The back reads made for an angel. I purchased all the items from Michael's crafts.
Thanks you so much for stopping by. Have a wonderful week! :)
Related Posts Plugin for WordPress, Blogger...