Showing posts with label Wedding Solutions. Show all posts

Wednesday, October 3, 2012

Frankeinstein Lantern and Matching Party Favors!!

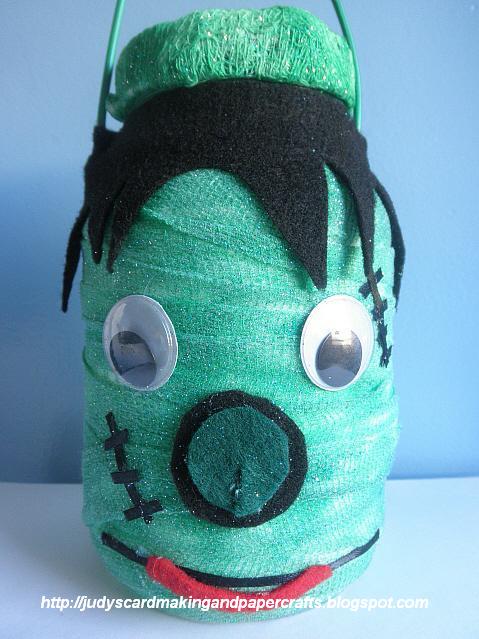
Happy Wednesday! I hope you are having a great day. I have a Halloween project to share today. This is a Frankenstein table decorations or carry around lantern. I used a plastic mayo jar to create this lantern. A plastic jar will be safe for my daughter to carry around. This project was inspired from HERE.
Here is a close up of the face. Isn't this Frankenstein so cute?
I also made some matching Frankenstein pillow boxes to go with lantern. I used the Cricut Wedding Cartridge to cut out pillow boxes.

Here is the supplies I used to create the Frankeinstein lantern. Plastic empty mayo jar, mod podge, google eyes and black felt, green glitter activity paint and flexible gauze. Small piece of red felt and green small amount of 1/4 inch black ribbon not shown in photo for face embellishment.
I punched two hole with the crop a dile so I could add green wire for a carry handle. One hole each on opposite side of plastic jar.
Paint mod podge on jar with sponge brush. I painted small section as I wrapped gauze around.
Wrap flexible gauze around jar and some around the jar cap too. I purchased my gauze at the Dollar Tree store for 1.00.
Paint green glitter activity paint on gauze.
Embellish face with black, red, green felt, google eyes and black 1/4 inch ribbon. I hand cut out black hair, nose and red piece of mouth embellishment. Add a tealight inside and that it. Here is how it looks:)
I'm linking this project here. Decorate to Celebrate Challenge #35 Halloween Party . Thank you for stopping by;)

Friday, April 1, 2011

Opened Book Shaped Baby Card!

Hello everyone! Happy Friday. I hope your day is going well. Here is a book keepsake card I designed for my niece. She is having twins!! We don't know the sex of the babies, but I'm hoping for one of them to be a girl. That why I posted this pink one:) If not I will give her a blue one or maybe one of each colors. I will be making the baby shoes for the party to give to guest. If we don't find out the sex of babies I will make green and yellow. I'm so happy for her. She is having twins!!


Here is a close up of shoe. This shoe is super cute. I made the shoe out of foam sheet and outlined the baby shoe with stickle glitter glue to give it some sparkle. The open book cut is from Cricut Wedding cartridge. The white roses I handmade:) This card is being entered in Frosted Designs Challenge to use bling on a project, Paper Romance Challenge #44 to use bling and Paper Pretties challenge to use bling on project.

After I finished making the card. I had to make a keepsake box for it. The box is a gift box. I cut a window and adhered clear Grafix Creative Plastic to box window:) Let me now what you think. Do you like the keepsake baby card and box?
Have a great weekend everyone and thank YOU so much for the visit:)

Friday, June 11, 2010

Mr and Mrs Wedding Day scrap page!

Click photo to enlarge!

Hello everyone! Happy Friday to you all! Here is a LO I designed in Cricut DesignStuidio. I welded it in DS. This LO was a request. She wanted a LO like my Happy 10th Anniversary LO, but for wedding Day. This is the bride's color theme for the wedding. This .cut file is by email only. Email me and let me know you want this .cut file and I will email it to you. You need all the cartridge I used and DS for this scrap page. I used cuttlebug embossing folder Swiss Dots to emboss this page. Have a wonderful weekend everyone!

Cartridge used:
Wedding
Plantin SchoolBook
Wild Card
Opposites Attract

This is for these Challenges
Fantabulous Cricut Challenge : #13 for the bride.
The cuttlebugspot challenge: To create a layout.

Sunday, February 14, 2010

Glass Etching Video!


Here is a glass etching video! I hope you all enjoy watching it. You all have a good week.

Cartridge I used:

Wedding Solutions to cut (heart).

Friday, January 1, 2010

Mug Box ... With Free Cut File .. And A Blog Candy Giveaway!!


Hi, everyone! Here is another mug box, I created in Cricut DesignStudio and Gypsy. I have the gypsy file and Cricut DesignStudio .cut file. I love this mug box. Fill it up with hot cocoa mix and you have a great gift. This box can be cut out on 12 x 12 cardstock or chipboard. The mug box measure size is 4 1/4 L X 3 3/4 W X 2 3/4 D inch. This box is bigger, then My first Gypsy project box. This mug box is easy to score.

Cartridge used:

Gypsy Wanderings to cut out mug box.

Here is Cricut DesignStudio file.

Here is Gypsy file.

Wedding Mariage Solutions to cut out (base and Shadow heart) cut at 3 inch.


Here is my blog candy giveaway! I will be giving away a Bowdabra Designer Bowmaker!! I love using this bow making tool and I know the winner will too! I will leave this at the top of blog, until January 11,2010 at 3 pm . You all thought I was going to put 2009. I did I had to change it! "LOL". I will have my daughter pick a winner out of a bowl. Here what you have to do. I will be checking your blog for blog candy giveaway post link. You must do all (3) to be entered in blog candy giveaway. I want to let everyone know the Bowdabra Bowmaker was donated by Sandy Sandler, Inventor of the Bowdabra. Thank you so much Sandy! I will have (2) winners for this giveaway! The 2nd winner will win a Martha Stewart deep edge punch ( flower bed).

1) Leave a comment.

2) Be a follower of my blog or become a follower.

3)Post a link of my Blog Candy Giveaway on your blog.

This is my first Blog Candy Giveaway !!! I hope you all like what Im giving away. I love it. Happy New Year!

Friday, November 20, 2009

Happy 10th Anniversary To.....

Click photo to enlarge
Me and Paul! Today is are 10th year Wedding Anniversary. We have been together for 27 years, but we have only been married for 10 years. We got married in a church we attended and we had a reception in the VFW Hall 10 year ago today. I remember the first time I seen Paul, I was 18 years old I know from that day on he was my soul mate and we would be together forever. Happy anniversary Paul and I hope we have many more! I made this LO in Cricut DesignStudio so I could post so you all could see how young we looked back then. Wow! we looked so young here. My four year old daughter looked at the LO and said " mommy you look like a princess lets go play dress up". Have a good day all.

Cartridge I used:

Wedding Solution for (love birds and heart at bottom page).

Plantin SchoolBook for (small hearts, flower and rectangle).

Opposites Attract for (letters) all welded in DesignStudio.

Friday, September 25, 2009

Heart Card With Cut File!


Hi all,

Here is a card I made in DesignStudio. It could be used as a Anniversary card or just to give to someone you love. I hope you all like it! You need to cut card on a 12 x 12 cardstock.

Cartridge I used:

Plantin SchoolBook for( Roly Poly heart and rectangle )I cut 4 more heart at 1 1/2 inch to layer hearts on out side of card and if you want you can cut 4 more heart for inside of card. I forgot to cut 4 for inside of card. Measure and cut a 4 1/2 inch square for inside of card for the heart window. Measure a piece of pattern paper and cut it 7 1/2 by 5 inch for inside of card. If you download my cut file leave a comment! I work hard on creating them free for you.

Wedding Mariage Solutions for( heart)and front of card (frame). I cut 1 heart at 4 inch to layer the out side of card. If you make this card with the cricut expression you need the cartridges I used. I hope you all download the cut file and make a card just like this! Have a good weekend all. ;0)

Here is the download cut file

Monday, September 7, 2009

Being with you, makes my life complete card!!


Hi all,

How was everyones holiday? I hope you all had a good Labor Day holiday! Here is a card, for the cuttlebug spot challenge #47: It's for the birds, for this challenge you have to use a bird. I used the birds and heart from the Wedding Mariage Solutions Cartridge. The birds and heart is cut at 2 inch and I used the shadow feature too. I used the Cricut Wild Card Cartridge for Card. The doily card was cut at 5 1/4 inch and I used blackout feature too. The liner was cut at 5 1/4 inch. I used the cuttlebug embosser and I used Swiss Dots folder. This is my card for the cuttle bug spot #47. I hope you all like it! Have a good evening all.

Friday, June 26, 2009

God Bless You Thanks Card


Good afternoon everyone, I hope you all are having a good day. This is a card I made for a friend of mine. I designed this card in the DesignStudio I used Plantin Schoolbook cartridge for rectangle shape of the card and stretch it and the scallop for the top, bottom and side of card and the Mini Monograms cartridge for the scallop circles and the Wild Card for God Bless You and thanks cut and Wedding Solutions cartridge for chapel cut. I will be going to the Latino Festival on Saturday and Sunday I will be eating a lot of Spanish foods. Have a good weekend all.
Related Posts Plugin for WordPress, Blogger...