Showing posts with label tutorial. Show all posts

Wednesday, May 7, 2014

Craft Stick Bracelets (Kid Craft #3)!!!!

Happy Wednesday! Hope you are having a great week. Here another craft my daughter wanted to make. We had fun making these. :) Can you believe we made these bracelets out of Jumbo Craft Sticks. Well we did and we had fun decorating them too!!!
I drilled holes on both sides of craft stick. We put ribbon through the holes so they can be tied on her wrist.
Here is a tutorial we followed to make our Craft Stick Bracelets! Hope you like them and you try making them with your kiddos.
Thanks for stopping by and looking! Have a fabulous week. :)Linking up to 2 Creative Chicks Challenge #14: Use Popsicle stick or any kind of food container. Linking up to several Linkup Parties from HERE.

Wednesday, February 19, 2014

Handmade Wire Bracelet!!

Hello all. Hope you all are having a great week!! We been getting a lot of snow here. I been spending a lot of time shoveling snow and cleaning all the salt of  my floors. When is it going to come to a end.  I can say I am sick of Winter and ready for Spring. I have a fun wire jewelry Project to share. I been wanting to make one of these wire bracelet and I finally made one. I used green wire since St Patrick's Day is coming around in March. This is not my idea. Here is the LINK if you want to see the tutorial on how to make one of these wire bracelet. I made my bracelet a little different.:) I wrapped wire around the front of bracelet. I love to bend and create jewelry with wire!!! ;)
Here is the bracelet on my wrist. I have a very small wrist and it wraps around the sides of my wrist. 
Here is how the bracelet  looks on back of  my wrist. I love how it looks. I will be making some more wire bracelets in different color wire!!:)
 Have a great week! Thank you so much for stopping by. :)

Wednesday, December 5, 2012

Christmas Lollipop Holders!!

Happy Wednesday! I hope you are having a great day! I have a yummy project to share today. I made a lot of these cute lollipop holders for my daughter to give to her classmates and friends. Here is a video tutorial on how to make these lollipop holders. My daughter chose these Christmas puffy stickers to go on these lollipop holders. The stickers was purchased from Walmart. The pattern paper is Provo Craft (Christmas Cheer) 6" x 12" paper. The solid white is Recollections cardstock.
I put ToosieRoll Pops inside the holders:) These are so fast to make and super cute.
I stamped Merry Christmas on back. I hope you are inspired and you create some for your child to give out:)
Thank you for stopping by and looking! Have a great week;)

Saturday, November 24, 2012

Sliding knot adjustable bracelet with card!

Happy Saturday! I hope you all here in the USA had a great Thanksgiving Day on Thursday! I sure did... I have a lot to be Thankful for this year. I made plenty of food on Thursday for my family and friends to enjoy. I love this time of year:) Today I'm sharing one of my Christmas craft fair items. This is a sliding knot adjustable bracelet and card set. All the teenage girls like this style of bracelets because they are adjustable to the wrist.
Here is a close up of the bracelet! These are really easy to make;) Here is a video tutorial on how to make a sliding knot adjustable bracelet.
Have a great weekend! Thank you for stopping by:)

Thursday, November 8, 2012

Round Gift Box idea!!!

Hello everyone! Hope all is doing fine. I been very busy volunteering at my daughter school and I haven't had much time to create any project this week. Here is an update on my job search to all who read that post. I posted a few months ago I was job hunting. After months of searching I can finally say I found a job and will start working on Monday:) I am so happy I will be getting a paycheck for my work!! I will try to join in some challenges and create some project when I can. You all know I'm a Designer for Decorate To Celebrate . I will always create projects for them ;) Here is a round handmade gift box I made a few weeks ago. I had so much fun making this round box. This box can hold a gift card or small gift. The scallop circle cuts on top and bottom of cake box is from Cricut Mini Monograms Cartridge. I used scrap paper to make round box cake and little tealight cake. Pattern cardstock is Martha Stewart and solid is Recollections cardstock. The butterflies was punched out with Martha Stewart Classic butterfly punch. The little cake on top is a tealight. You can check out the tutorial right HERE!
I would tell you how I made my round box but I don't have time to do a tutorial on it. When I get a chance I will do a tutorial on how to make the box;) This round box is so cute with the tealight on top:) Here is a view of the top.
I will be around later to visit and leave some comments. Have a wonderful week. Thank you for stopping by;)

Friday, October 5, 2012

Lanyard Key Holder Project!!

Happy Friday! I hope you all are having a great day. I have two awesome project to share with you all today. Today! I created a lanyard key holder to wear around the neck in bright pink and silver ribbon shape hope earrings! October is breast cancer Awareness month. Have you had your mammogram yet? If not you should make an appointment to have one done. A friend of mine who is 37 wake up one morning in July 2012 had a lump in her breast. Went to the Doctor and was diagnosed with stage 4 breast cancer. Three weeks later they had to remove her breast. Now she is under going treatments. My friend has lost all of her hair:( I made a few of these to give to my Mom, Daughter, Sisters and a couple of my friends. The lanyard key holder and earrings are so easy to make. I'm linking these projects over at Link Up For Pink link up party 2012. Go over and check out all the pink projects already linked up for Breast Cancer Awareness Month!
Here is a close up of the earrings. I purchased the ribbon shape charms, jump rings and fish hook earring findings and I created these breast awareness ribbon earrings.  The ribbon charm has Hope on  it.
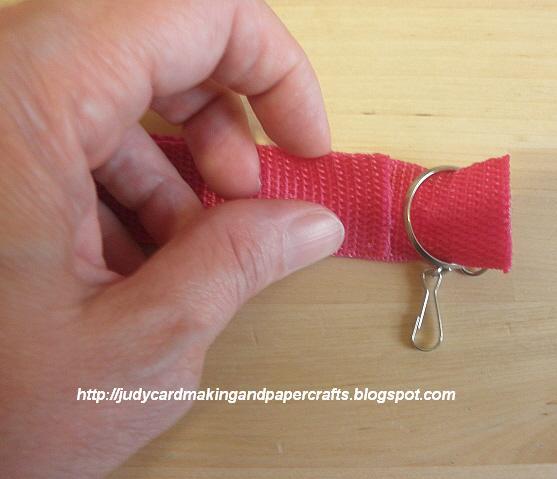
To create the lanyard key holder. I used a 36 inch piece of belting nylon strap and a key ring. I sewed the ends together like below.
Here is a tutorial on how the lanyard nylon strap should look to get ready to sew it together. Grab ends like this.
Fold long end of strap over like this. When you look from the side it should look like this. Add key ring and sew ends together with sewing machine.
Here is the finish results after sewing a straight line. Now wasn't that easy. This is a great way to keep from laying keys around like I do and losing them;)
Have a great weekend all. Thank you for stopping by;)

Wednesday, October 3, 2012

Frankeinstein Lantern and Matching Party Favors!!

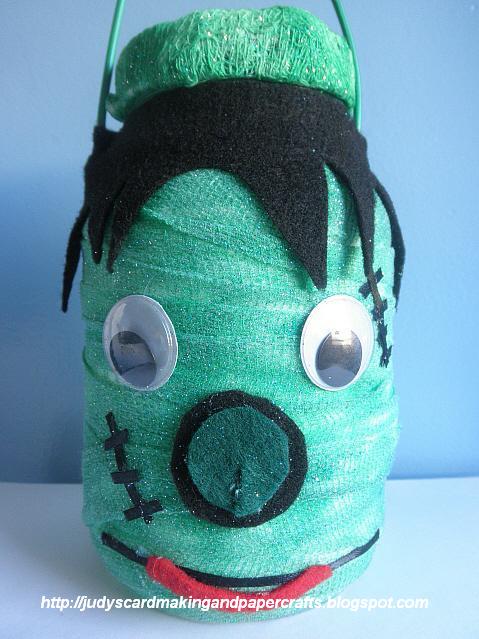
Happy Wednesday! I hope you are having a great day. I have a Halloween project to share today. This is a Frankenstein table decorations or carry around lantern. I used a plastic mayo jar to create this lantern. A plastic jar will be safe for my daughter to carry around. This project was inspired from HERE.
Here is a close up of the face. Isn't this Frankenstein so cute?
I also made some matching Frankenstein pillow boxes to go with lantern. I used the Cricut Wedding Cartridge to cut out pillow boxes.

Here is the supplies I used to create the Frankeinstein lantern. Plastic empty mayo jar, mod podge, google eyes and black felt, green glitter activity paint and flexible gauze. Small piece of red felt and green small amount of 1/4 inch black ribbon not shown in photo for face embellishment.
I punched two hole with the crop a dile so I could add green wire for a carry handle. One hole each on opposite side of plastic jar.
Paint mod podge on jar with sponge brush. I painted small section as I wrapped gauze around.
Wrap flexible gauze around jar and some around the jar cap too. I purchased my gauze at the Dollar Tree store for 1.00.
Paint green glitter activity paint on gauze.
Embellish face with black, red, green felt, google eyes and black 1/4 inch ribbon. I hand cut out black hair, nose and red piece of mouth embellishment. Add a tealight inside and that it. Here is how it looks:)
I'm linking this project here. Decorate to Celebrate Challenge #35 Halloween Party . Thank you for stopping by;)

Tuesday, July 10, 2012

Ice Cream Shape Party Favors Idea!

Hello everyone! Hope you are having a wonderful Tuesday. I made (20) of these for a friend. She wanted a ice cream shape party favor for her daughter Birthday party. This is what I made for her. The ice cream on top of cone is a bath sponge. I hope the girls will love the bath sponge I put in the paper cones. I thought I would put a gift in the cone the girls could use over and over again. The bath sponges were purchased from the Dollar Tree store. All five colors came in a pack for $1.00. That cost for each bath sponge is 20 cents.
This pattern cardstock is from a Martha Stewart paper pack. I stamped thank you on red tags and tied it on clear loot bags.
To make these you will need a scallop circle cut at 6 3/4 inch or a regular cicle. I cut (4)scallop circles on a 12 by 12 piece of cardstock. This scallop circle is from Cricut Mini Monograms and is on page #129 of handbook.
I used some glue to adhered scallop circle together in front. It should look like this one here. This pattern paper here is Recollections cardstock. The sponges are (5) in a pack, clear loot bags (25) in a pack with silver ties and the yellow gift wrapping raffia are from the Dollar Tree Store. Each item cost only $1.00. That is a great buy:) These make great party favors too. I hope my friend like what I came up with.
Linking this here. Decorate To Celebrate Challenge #29- Party Decoration Idea for a little one. Thanks for stopping by. Have a wonderful week:)

Friday, February 24, 2012

Pretty Flower Ball #5

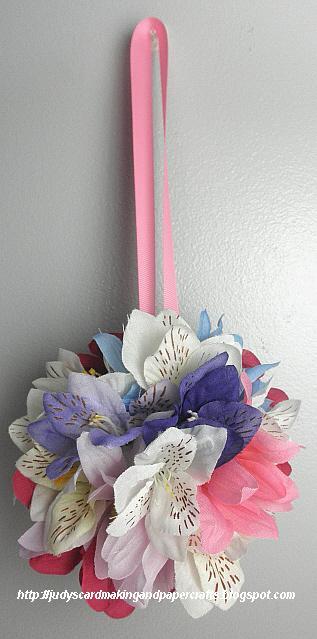
Hello everyone. Hope you are having a fabulous Friday! Here is a hanging flower ball. I made this one for a friend. I make these all the time but I don't post everyone I make. I will be making some of these for the Spring Bazaar! Here is a Flower Ball tutorial for you to check out. Maybe you will give it a try and make one. These are so fun and very easy to make.

Here is the flower ball hanging on the wall. These flower balls are great for decorating any room. Everyone who receives one from me just loves how it looks ;) I got to go now! Too much to do and not enough time to get it done!!

Thank you for looking. Have a wonderful weekend everyone (;

Wednesday, February 15, 2012

It's My Birthday Badge!

Hello everyone! Hope you all had a Happy Valentine's Day yesterday. We sure did here! Here is a birthday badge I made. My daughter wanted me to make these badges for her and some of her friends for their Birthdays. I hot glued a pin on the back of them so they can be worn on their clothing. My little princess will be wearing her badge to school tomorrow. She will be 7 years old!!

I created the It's My Birthday button in My Memories Suite Software. Here is a discount code if you want to purchase the software. Use this discount code here STMMMS15941 to get $10 discount and another $10 coupon to spend in My Memories store in your email. Here is a tutorial on how to make a paper rosette.

Thank you for stopping by and looking. Have a great week everyone:)

Thursday, February 2, 2012

Gorgeous Flower Pen Project!!

Hello everyone! Hope your week is going great. Thought I would share this project I put together today with you! Isn't these flower pens gorgeous? I made some of these last year and never posted them on my blog. Everyone who received one loved it. Some of them ask if I would be making more for this year. These sell good at craft fairs and they are very easy to make:)

Here is a close up of the flower pens. I used pastel color for the flowers pens.

Here is a tutorial on how I put these together. You will need to purchase a bunch of flowers, some pens, glue gun and a wire cutter to cut the artificial flowers.

First I cut all the flowers down with the wire cutter and add glue to flower where ever need to keep artificial flowers together. Pull out the plastic piece in the top of pen. Fill the pen hole with a lot of hot glue and I mean a lot of hot glue. Stick the artificial cut flower down in top of pen hole and hold down until it glues.

Hope you all love my flower pen project for today. Have a wonderful week. Thank you all for looking:)

Wednesday, July 13, 2011

Decorate To Celebrate Guest Designer!!!!

Hello friends. Happy Wednesday to you all! I hope you're having a terrific day! I am so excited and honored to have been ask by Rhonda and Amy to be a Guest Designer for Decorate To Celebrate Challenge #4 Kids Party Theme. I decided to create a Princess for a day party theme for my daughter and one of her friends. Here is the decorations I made for the Princess party. I made a 3D Castle, party favor bag, crown and princess party invitations. I used my Gypsy for this project and I used the Once Upon a Princess Cartridge to create the decorations:)


Here is a close up of the Castle. I used glitter paper I purchase from Target and I had so much glitter all over my cutting mat and it was every where from this glitter paper. This little castle is so beautiful and makes a great decoration:)


I love the crown too! You can't have a princess party with out a crown.


My daughter wanted me to make some Princess bean bags and here they are. She loves to toss these little bean bags around. I made a tutorial to show how I made them.


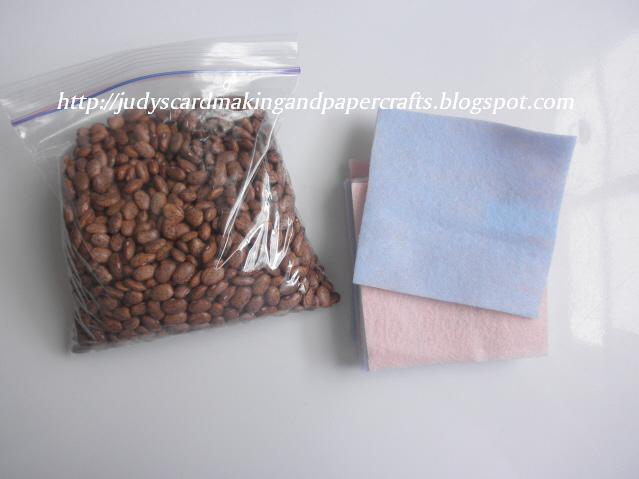
You will need (2) 9 x 12inch felt sheets and some dry beans. Cut felt sheets to 4 by 4 inch squares. You can get (6) bean bags out of the (2) felt sheets.


Face the right side of felt sheets together and then sew about 1/4 inch around edges. Leave a open edge so it can be turned to the right side.


Here how it should looks when its turned to right side. The open edge where it not sewn is where the bean can be put in that opening.


I hand stitched the opening with invisible nylon thread.


I made a crown stencil with heavy card stock. The crown stencil is cut from Once upon a Princess cart. I placed the crown stencil on bean bag and sponge dabbed the purple puffy paint on the felt. I love how these bean bags turned out ;0)


Thank you Rhonda and Amy for asking me to be your Guest Designer. I had so much fun creating this princess party project. Thank you all for stopping by and looking. Have a terrific week everyone:)

Thursday, June 23, 2011

Patriotic ribbon bracelets!!

Hello everyone. I hope you are having a great Thursday! It's very rainy and gloomy here. I made some of these patriotic ribbon bracelets last year in a different patriotic ribbon and gave them out at the 4Th Of July cookout. My daughter wanted me to make more of them for this year. I will be giving these out at this years cook out. I made them in size 7 in and 8 in and some small bracelets for the little children. This photo is my daughter showing off the bracelets on her wrist.


I used the i rock tool to set the silver gems on the red, white and blue bracelets. I've been using that tool a lot lately. Great tool to have for my projects:)


Here the Supplies and tool I used to make these bracelets. I purchased the eyelet and snap plier tool at Micheal's and ribbon too. These tool is a great tool to own. I used it on all my crafts. I love it:) The snaps I purchased at Walmart. I cut pieces of ribbon 7 in and 8 in long to make bracelets. I made some smaller for the children too. I applied clear finger nail polish to the ends of cut ribbons to keep it from fraying apart. All that matters it keeps it from fraying apart. Set the snaps in ribbon where you want them and you have a snap bracelet. This tool is easy to use. These make great gifts to give out and they can be made in any color ribbon you like;) I like these ribbon bracelets better then the plastic ones they are selling in the stores. I hope you all like this idea and you make some too:) Let me know what you think about it!


I'm linking this to these challenges
Craft Us Crazy challenge to create a red, white and blue or summer theme project.
Decorate to Celebrate challenge 4 th Of July Decorations projects.
Have a great day and thank you for stopping by and looking :)
Related Posts Plugin for WordPress, Blogger...